SIGMA's BLOG

但行好事,莫问前程

 结构

代码

1
2
3
4
5
6
7
8
9
10
11
12
13
14
15
16
17
18
19
20
21
22
23
24
25
26
27
28
29
30
31
32
33
34
35
36
37
38
39
40
41
42
43
44
45
46
47
48
49
50
51
52
53
54
55
56
57
58
59
60
61
62
63
64
65
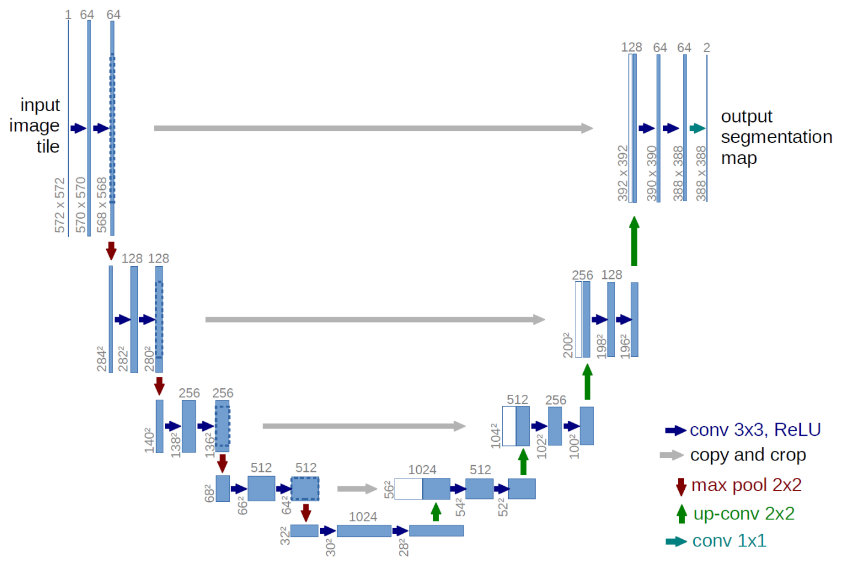
def get_unet():
concat_axis = 3
inputs = Input((IW, IH, 3))
conv1 = Conv2D(32, (3, 3), activation='relu', padding='same')(inputs)
conv1 = Convolution2D(32, (3, 3), activation='relu', padding='same')(conv1)
pool1 = MaxPooling2D(pool_size=(2, 2))(conv1)
print('conv1', conv1.shape)
print('pool1', pool1.shape)

conv2 = Convolution2D(64, (3, 3), activation='relu', padding='same')(pool1)
conv2 = Convolution2D(64, (3, 3), activation='relu', padding='same')(conv2)
pool2 = MaxPooling2D(pool_size=(2, 2))(conv2)
print('conv2', conv2.shape)
print('pool2', pool2.shape)

conv3 = Convolution2D(128, (3, 3), activation='relu', padding='same')(pool2)
print('conv3', conv3.shape)
conv3 = Convolution2D(128, (3, 3), activation='relu', padding='same')(conv3)
pool3 = MaxPooling2D(pool_size=(2, 2))(conv3)
print('conv3', conv3.shape)
print('pool3', pool3.shape)

conv4 = Convolution2D(256, (3, 3), activation='relu', padding='same')(pool3)
conv4 = Convolution2D(256, (3, 3), activation='relu', padding='same')(conv4)
pool4 = MaxPooling2D(pool_size=(2, 2))(conv4)
print('conv4', conv4.shape)
print('pool4', pool4.shape)

conv5 = Convolution2D(512, (3, 3), activation='relu', padding='same')(pool4)
conv5 = Convolution2D(512, (3, 3), activation='relu', padding='same')(conv5)
print('conv5', conv5.shape)

USampling6 = UpSampling2D(size=(2, 2))(conv5)
print('USampling6', USampling6.shape)
up6 = concatenate([USampling6, conv4], axis=concat_axis)
conv6 = Convolution2D(256, (3, 3), activation='relu', padding='same')(up6)
conv6 = Convolution2D(256, (3, 3), activation='relu', padding='same')(conv6)
print('conv6', conv6.shape)

USampling7 = UpSampling2D(size=(2, 2))(conv6)
print('USampling7', USampling7.shape)
up7 = concatenate([USampling7, conv3], axis=concat_axis)
conv7 = Convolution2D(128, (3, 3), activation='relu', padding='same')(up7)
conv7 = Convolution2D(128, (3, 3), activation='relu', padding='same')(conv7)
print('conv7', conv7.shape)

USampling8 = UpSampling2D(size=(2, 2))(conv7)
print('USampling8', USampling8.shape)
up8 = concatenate([USampling8, conv2], axis=concat_axis)
conv8 = Convolution2D(64, (3, 3), activation='relu', padding='same')(up8)
conv8 = Convolution2D(64, (3, 3), activation='relu', padding='same')(conv8)
print('conv8', conv8.shape)

USampling9 = UpSampling2D(size=(2, 2))(conv8)
print('USampling9', USampling9.shape)
up9 = concatenate([USampling9, conv1], axis=concat_axis)
conv9 = Convolution2D(32, (3, 3), activation='relu', padding='same')(up9)
conv9 = Convolution2D(32, (3, 3), activation='relu', padding='same')(conv9)
print('conv9', conv9.shape)

conv10 = Convolution2D(N_Cls, (1, 1), activation='sigmoid')(conv9)

model = Model(input=inputs, output=conv10)
model.compile(optimizer=Adam(), loss='binary_crossentropy', metrics=[jaccard_coef, jaccard_coef_int, 'accuracy'])
return model

注意

  • UNet的结构对输入数据的尺寸是有要求的,我也没搞清楚FCN宣称的对输入图片大小没要求,必须使其在conv、pooling后的W和H都能被2整除,否则后面USampling会出现尺寸不一致的问题。
  • 关于label,必须是(IW, IH, 1)这种格式,不然出错。另外,如果是多类识别,需要用keras.preprocessing.tocate???事先处理,转换成类别vector,或者你的label本来就是1,2,3标记好了的也可以不用转。

Xavier

  • 此方法用于初始化参数

  • 初始化方法:

    定义参数所在层的input_shape = n,output_shape = m,那么参数将以均匀分布的方式在以下在 $[-\sqrt{\frac{6}{m+n}}, \sqrt{\frac{6}{m+n}}]$ 的范围内进行初始化

代码解读

1
2
3
4
5
6
7
8
9
10
11
12
13
14
15
16
17
18
19
20
21
22
23
24
25
26
27
28
29
30
31
32
33
34
35
36
37
38
39
40
41
42
43
44
45
46
47
48
49
50
51
52
53
54
55
56
57
58
59
60
61
62
63
64
65
66
67
68
69
70
71
72
73
74
75
76
77
78
79
80
81
82
83
84
85
86
87
88
89
90
91
92
93
94
import theano
from theano import tensor as T
from theano.tensor.nnet import conv2d
import numpy

rng = numpy.random.RandomState(23455)

# instantiate 4D tensor for input
input = T.tensor4(name='input')

# initialize shared variable for weights.
w_shp = (2, 3, 9, 9)
w_bound = numpy.sqrt(3 * 9 * 9)
W = theano.shared( numpy.asarray(
rng.uniform(
low=-1.0 / w_bound,
high=1.0 / w_bound,
size=w_shp),
dtype=input.dtype), name ='W')
'''
用uniform初始化
不知为何定义shape为(2, 3, 9, 9)
'''


# initialize shared variable for bias (1D tensor) with random values
# IMPORTANT: biases are usually initialized to zero. However in this
# particular application, we simply apply the convolutional layer to
# an image without learning the parameters. We therefore initialize
# them to random values to "simulate" learning.
b_shp = (2,)
b = theano.shared(numpy.asarray(
rng.uniform(low=-.5, high=.5, size=b_shp),
dtype=input.dtype), name ='b')

# build symbolic expression that computes the convolution of input with filters in w
conv_out = conv2d(input, W)

# build symbolic expression to add bias and apply activation function, i.e. produce neural net layer output
output = T.nnet.sigmoid(conv_out + b.dimshuffle('x', 0, 'x', 'x'))

# create theano function to compute filtered images
f = theano.function([input], output)


import numpy
import pylab
from PIL import Image

# open random image of dimensions 639x516
'''
这里要加'rb',不然报Unicode错,字符不能以utf-8编码,16,32都不行
'''
img = Image.open(open('doc/images/3wolfmoon.jpg', 'rb'))
# dimensions are (height, width, channel)
img = numpy.asarray(img, dtype='float64') / 256.

# put image in 4D tensor of shape (1, 3, height, width)
'''
这里img.shape = (639, 516, 3)
img.transpose(2, 0, 1).shape = (3, 639, 516)
img_.shape = (1, 3, 639, 516)
reshape将数组变成
0:1
0:3
0:639
0:516
这个样子
初步估计,首先3是图像的RGB,后面的是尺寸。为方便处理,转换成3在前面。
然后由于input定义为4D的所以要做这个处理。对input的4D分别是:
> mini-batch size, number of input feature maps, image height, image width
'''
img_ = img.transpose(2, 0, 1).reshape(1, 3, 639, 516)
filtered_img = f(img_)
'''
filtered_img.shape(1, 2, 631,508)
不理解为何处理后变为2
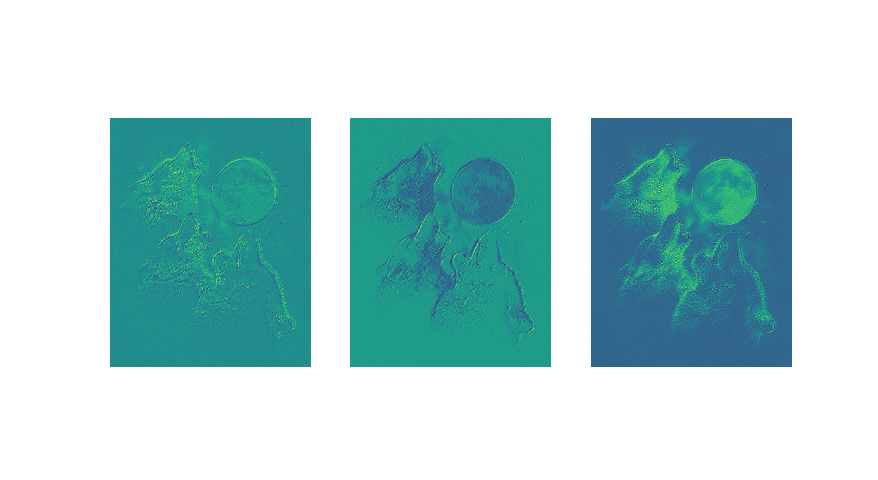
更新:是由W,b的shape决定的,当改为3,输出也是3
改为3后如图三所示
'''
# plot original image and first and second components of output
pylab.subplot(1, 3, 1); pylab.axis('off'); pylab.imshow(img)
'''
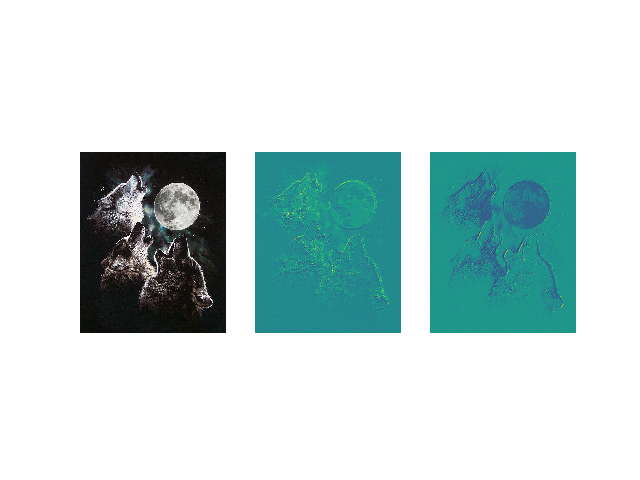
这句的作用是将处理后的结果以灰图显示,若不加如图二
'''
pylab.gray();
# recall that the convOp output (filtered image) is actually a "minibatch",
# of size 1 here, so we take index 0 in the first dimension:
pylab.subplot(1, 3, 2); pylab.axis('off'); pylab.imshow(filtered_img[0, 0, :, :])
pylab.subplot(1, 3, 3); pylab.axis('off'); pylab.imshow(filtered_img[0, 1, :, :])
pylab.show()

网站原图

no_gray

shape改为3

本代码还有点小问题没解决,应该直接运行会报错,不过不影响理解,时间关系不过于纠结

This tutorial introduces the LeNet5 neural network architecture
using Theano. LeNet5 is a convolutional neural network, good for
classifying images. This tutorial shows how to build the architecture,
and comes with all the hyper-parameters you need to reproduce the
paper’s MNIST results.

This implementation simplifies the model in the following ways:

  • LeNetConvPool doesn’t implement location-specific gain and bias parameters
  • LeNetConvPool doesn’t implement pooling by average, it implements pooling
    by max.
  • Digit classification is implemented with a logistic regression rather than
    an RBF network
  • LeNet5 was not fully-connected convolutions at second layer

References:

1
2
3
4
5
6
7
8
9
10
11
12
13
14
15
16
17
18
19
20
21
22
23
24
25
26
27
28
29
30
31
32
33
34
35
36
37
38
39
40
41
42
43
44
45
46
47
48
49
50
51
52
53
54
55
56
57
58
59
60
61
62
63
64
65
66
67
68
69
70
71
72
73
74
75
76
77
78
79
80
81
82
83
84
85
86
87
88
89
90
91
92
93
94
95
96
97
98
99
100
101
102
103
104
105
106
107
108
109
110
111
112
113
114
115
116
117
118
119
120
121
122
123
124
125
126
127
128
129
130
131
132
133
134
135
136
137
138
139
140
141
142
143
144
145
146
147
148
149
150
151
152
153
154
155
156
157
158
159
160
161
162
163
164
165
166
167
168
169
170
171
172
173
174
175
176
177
178
179
180
181
182
183
184
185
186
187
188
189
190
191
192
193
194
195
196
197
198
199
200
201
202
203
204
205
206
207
208
209
210
211
212
213
214
215
216
217
218
219
220
221
222
223
224
225
226
227
228
229
230
231
232
233
234
235
236
237
238
239
240
241
242
243
244
245
246
247
248
249
250
251
252
253
254
255
256
from __future__ import print_function

import os
import sys
import timeit

import numpy

import theano
import theano.tensor as T
from theano.tensor.signal import pool
from theano.tensor.nnet import conv2d

from code.logistic_sgd import LogisticRegression, load_data
from code.mlp import HiddenLayer


class LeNetConvPoolLayer(object):
def __init__(self, rng, input, filter_shape, image_shape, poolsize=(2, 2)):
assert image_shape[1] == filter_shape[1]
self.input = input

fan_in = numpy.prod(filter_shape[1:])
fan_out = (filter_shape[0] * numpy.prod(filter_shape[2:]) //
numpy.prod(poolsize))

# Xarvier初始化方法
W_bound = numpy.sqrt(6. / (fan_in + fan_out))
# 均匀分布
self.W = theano.shared(
numpy.asarray(
rng.uniform(low=-W_bound, high=W_bound, size=filter_shape),
dtype=theano.config.floatX
),
borrow=True
)

b_values = numpy.zeros((filter_shape[0],), dtype=theano.config.floatX)
# 一个filter一个b
self.b = theano.shared(value=b_values, borrow=True)

conv_out = conv2d(
input=input,
filters=self.W,
filter_shape=filter_shape,
input_shape=image_shape
)

pooled_out = pool.pool_2d(
input=conv_out,
ds=poolsize,
ignore_border=True
)

# add the bias term. Since the bias is a vector (1D array), we first
# reshape it to a tensor of shape (1, n_filters, 1, 1). Each bias will
# thus be broadcasted across mini-batches and feature map
# width & height
self.output = T.tanh(pooled_out + self.b.dimshuffle('x', 0, 'x', 'x'))

# store parameters of this layer
self.params = [self.W, self.b]

# keep track of model input
self.input = input


def evaluate_lenet5(learning_rate=0.1, n_epochs=200,
dataset='mnist.pkl.gz',
nkerns=[20, 50], batch_size=500):
rng = numpy.random.RandomState(23455)
datasets = load_data(dataset)

train_set_x, train_set_y = datasets[0]
valid_set_x, valid_set_y = datasets[1]
test_set_x, test_set_y = datasets[2]
print('train:', train_set_x.shape, train_set_y.shape)
print('valid:', valid_set_x.shape, valid_set_y.shape)
print('test:', test_set_x.shape, test_set_y.shape)

n_train_batches = train_set_x.get_value(borrow=True).shape[0]
n_valid_batches = valid_set_x.get_value(borrow=True).shape[0]
n_test_batches = test_set_x.get_value(borrow=True).shape[0]
# // 除取整,返回商的整数部分
# 求有几个batch
n_train_batches //= batch_size
n_valid_batches //= batch_size
n_test_batches //= batch_size

# lscalar是一种TensorType,意思是long scalar,
# 他们的不同之处是是dtype、ndim、brodcastable
# http://deeplearning.net/software/theano/library/tensor/basic.html
index = T.lscalar()

x = T.matrix('x')
y = T.ivector('y')

print('... building the model')

layer0_input = x.reshape((batch_size, 1, 28, 28))
layer0 = LeNetConvPoolLayer(
rng,
input=layer0_input,
image_shape=(batch_size, 1, 28, 28),
filter_shape=(nkerns[0], 1, 5, 5),
poolsize=(2, 2)
)

layer1 = LeNetConvPoolLayer(
rng,
# 注意这里,直接就填layer0.output,不用自己算了
input=layer0.output,
# 上一层有nkerns[0]个filter
# 一个image和n个filter得到n张feature map
# 就相当于一个image被处理出了n个channel
image_shape=(batch_size, nkerns[0], 12, 12),
filter_shape=(nkerns[1], nkerns[0], 5, 5),
poolsize=(2, 2)
)

# 被flatten成2D的
layer2_input = layer1.output.flatten(2)
layer2 = HiddenLayer(
rng,
input=layer2_input,
n_in=nkerns[1] * 4 * 4,
n_out=500,
activation=T.tanh
)

layer3 = LogisticRegression(input=layer2_input, n_in=500, n_out=10)

cost = layer3.negative_log_likelihood(y)

test_model = theano.function(
[index],
layer3.errors(y),
givens={
x: test_set_x[index * batch_size: (index + 1) * batch_size],
y: test_set_y[index * batch_size: (index + 1) * batch_size]
}
)

validate_model = theano.function(
[index],
layer3.errors(y),
givens={
x: valid_set_x[index * batch_size: (index + 1) * batch_size],
y: valid_set_y[index * batch_size: (index + 1) * batch_size]
}
)

params = layer3.params + layer2.params + layer1.params + layer0.params
grads = T.grad(cost, params)

# 首先grads是已定义的求导运算,在运行时grads包含所有layer所有参数的导数
# updates的每一个elem都是(param_i, 已使用GD更新的param_i)
updates = [
(param_i, param_i - learning_rate * grad_i)
for param_i, grad_i in zip(params, grads)
]

# 它是一条数据一条数据地训练的...
train_model = theano.function(
[index],
cost,
updates=updates,
givens={
x: train_set_x[index * batch_size: (index + 1) * batch_size],
y: train_set_y[index * batch_size: (index + 1) * batch_size]
}
)

print('... training')
patience = 10000
patience_increase = 2
improvement_threshold = 0.995
validation_frequency = min(n_train_batches, patience // 2)

# inf = infinite 无穷大
best_validation_loss = numpy.inf
best_iter = 0
test_score = 0.
start_time = timeit.default_timer

epoch = 0
done_looping = False
# 设置训练的终止条件
while (epoch < n_epochs) and (not done_looping):
epoch = epoch + 1
# 每个batch一次
for minibatch_index in range(n_train_batches):
# iter是目前遍历到第几组数据
iter = (epoch - 1) * n_train_batches + minibatch_index

if iter % 100 == 0:
print('training @ iter = ', iter)
# minibatch_index是训练到目前batch中的第几个
# train_model输出的是cost
cost_ij = train_model(minibatch_index)
# 如果一个epoch完了
if (iter + 1) % validation_frequency == 0:

# compute zero-one loss on validation set
# 将每个batch的val_loss加起来求mean
validation_losses = [validate_model(i) for i
in range(n_valid_batches)]
this_validation_loss = numpy.mean(validation_losses)
print('epoch %i, minibatch %i/%i, validation error %f %%' %
(epoch, minibatch_index + 1, n_train_batches,
this_validation_loss * 100.))

# if we got the best validation score until now
if this_validation_loss < best_validation_loss:

# improve patience if loss improvement is good enough
if this_validation_loss < best_validation_loss * \
improvement_threshold:
# 如果val_loss还有提高的话,就把patience设大一些
patience = max(patience, iter * patience_increase)

# save best validation score and iteration number
best_validation_loss = this_validation_loss
best_iter = iter

# test it on the test set
test_losses = [
test_model(i)
for i in range(n_test_batches)
]
test_score = numpy.mean(test_losses)
print((' epoch %i, minibatch %i/%i, test error of '
'best model %f %%') %
(epoch, minibatch_index + 1, n_train_batches,
test_score * 100.))

if patience <= iter:
done_looping = True
break

end_time = timeit.default_timer()
print('Optimization complete.')
print('Best validation score of %f %% obtained at iteration %i, '
'with test performance %f %%' %
(best_validation_loss * 100., best_iter + 1, test_score * 100.))
print(('The code for file ' +
os.path.split(__file__)[1] +
' ran for %.2fm' % ((end_time - start_time) / 60.)), file=sys.stderr)


if __name__ == '__main__':
evaluate_lenet5()


def experiment(state, channel):
evaluate_lenet5(state.learning_rate, dataset=state.dataset)

实质

经过一番推算,其tc前后的shape的计算方式是conv求输出size的逆运算

从1式

到2式

 注意

  • 2式中,S和K值相同,而2*2的kernal size,K=2,这点和conv不一样。
  • 有一个巨坑!若keras中的conv的padding=’same’,函数会填充使得输入输出尺寸相同!

结合UNet

UNet的结构对输入数据的尺寸是有要求的,必须使其在conv、pooling后的W和H都能被2整除,否则后面USampling会出现尺寸不一致的问题。

pooling

下面的代码主要是想告诉我们ignore_border=True/False的区别,看output就知道了。由于没有说明stride大小,pool_2d默认处理为跟pool_shape一样
```python from theano.tensor.signal import pool

input = T.dtensor4(‘input’)
maxpool_shape = (2, 2)
pool_out = pool.pool_2d(input, maxpool_shape, ignore_border=True)
f = theano.function([input],pool_out)

invals = numpy.random.RandomState(1).rand(3, 2, 5, 5)
print ‘With ignore_border set to True:’
print ‘invals[0, 0, :, :] =\n’, invals[0, 0, :, :]
print ‘output[0, 0, :, :] =\n’, f(invals)[0, 0, :, :]

pool_out = pool.pool_2d(input, maxpool_shape, ignore_border=False)
f = theano.function([input],pool_out)
print ‘With ignore_border set to False:’
print ‘invals[1, 0, :, :] =\n ‘, invals[1, 0, :, :]
print ‘output[1, 0, :, :] =\n ‘, f(invals)[1, 0, :, :]

1
2
<h3 id="output"><a href="#output" class="headerlink" title="output"></a>output</h3>

With ignore_border set to True:
invals[0, 0, :, :] =
[[ 4.17022005e-01 7.20324493e-01 1.14374817e-04 3.02332573e-01 1.46755891e-01]
[ 9.23385948e-02 1.86260211e-01 3.45560727e-01 3.96767474e-01 5.38816734e-01]
[ 4.19194514e-01 6.85219500e-01 2.04452250e-01 8.78117436e-01 2.73875932e-02]
[ 6.70467510e-01 4.17304802e-01 5.58689828e-01 1.40386939e-01 1.98101489e-01]
[ 8.00744569e-01 9.68261576e-01 3.13424178e-01 6.92322616e-01 8.76389152e-01]]
output[0, 0, :, :] =
[[ 0.72032449 0.39676747]
[ 0.6852195 0.87811744]]

With ignore_border set to False:
invals[1, 0, :, :] =
[[ 0.01936696 0.67883553 0.21162812 0.26554666 0.49157316]
[ 0.05336255 0.57411761 0.14672857 0.58930554 0.69975836]
[ 0.10233443 0.41405599 0.69440016 0.41417927 0.04995346]
[ 0.53589641 0.66379465 0.51488911 0.94459476 0.58655504]
[ 0.90340192 0.1374747 0.13927635 0.80739129 0.39767684]]
output[1, 0, :, :] =
[[ 0.67883553 0.58930554 0.69975836]
[ 0.66379465 0.94459476 0.58655504]
[ 0.90340192 0.80739129 0.39767684]]
```

Github Page

在github上新建一个repo,命名为:username.github.io

git clone 刚刚新建的repo

安装Hexo

安装教程

将概述与建站做好就可以了

若安装出错或者链接超时

1
2
3
4
npm install -g cnpm --registry=https://registry.npm.taobao.org
npm config set registry https://registry.npm.taobao.org

所以之后的npm install命令 都改成cnpm install就可以啦

配置主题

在 https://hexo.io/themes/ 上找一个喜欢的主题,按它的说明添加到自己的项目里面,就可以了。

SS安装方法

PPA is for Ubuntu >= 14.04.

1
2
3
sudo add-apt-repository ppa:hzwhuang/ss-qt5
sudo apt-get update
sudo apt-get install shadowsocks-qt5

账号购买地址:https://sslinkcom.com/ (可能会时不时被封)

联系方式:sslinkcom@gmail.com

SwitchyOmega

到github上搜,然后在chrome里面安装完后,按官方说明配置。

注意:proxy一项,server设置为local的,port也是。具体的server和port在SS账号里面有

配置

1
2
3
4
5
6
CPU:Intel E3-1231 v3 @ 3.40GHz
显卡:GTX970
内存:16G
硬盘:SSD256G+HHD2T

拟安装:Ubuntu16.04

出现的问题

  1. 无法进入install ubuntu
  2. 进入install ubuntu开始安装时提示

    “The attempt to mount a file system with type vfat in SCSI2 (0,0,0), partition #1 (sda) at /boot/efi failed You may resume partitioning from the partitioning menu.”

  3. 安装完重启后无法进入系统,看不到grub,直接黑屏

解决办法

1.无法进入install ubuntu

进入livecd的grub界面,光标移动到install ubuntu,按e进入编辑模式,找到”quite splash” 然后改为“quite splash nomodeset”,按F10

2.提示”The attempt to mount a file system … at /boot/efi failed …”

问题出在你的硬盘没有EFI分区,当安装程序试图创建引导项的时候就会出错。

进入PE系统用DG分区工具,选快速分区,里面可以选MBR或者GUID。选GUID,把左下角“重建EFI分区”和“MS?分区”勾上,然后再重新安装ubuntu

3.安装完重启后无法进入系统,看不到grub,直接黑屏

两个办法

办法1

用livecd,选“try ubuntu without installing”,按e,如上加“nomodeset”,进入ubuntu。

1
2
3
4
5
6
7
8
# sda3为ubuntu所在分区,这个要换成你自己的
sudo mount /dev/sda3 /mnt
cd /mnt
sudo vi etc/default/grub

GRUB_CMDLINE_LINUX_DEFAULT="quiet splash"
## 改为
GRUB_CMDLINE_LINUX_DEFAULT="quiet splash nomodeset"

本办法试了,对我木有用。不过可能对某些情况有用。

办法2

由于我的硬盘只装了一个ubuntu,所以不显示grub会直接进入系统,但是由于ubuntu跟GTX970不兼容(我怀疑是我这个显卡品牌奇葩),所以直接黑屏。

所以目的很明确,就是要调出grub

有几种办法:

  • 再装一个win,多了个启动项就会出现grub让你选操作系统
  • 开机后按住shift,会进入grub,然后按e进入编辑模式,将”quiet splash”改为”quiet splash nomodeset”,按F10。进入系统后装好nvidia驱动。

最后

本次我先装了ubuntu再装win10的官方iso,于是ubuntu就无法引导启动了。搞了整整一个白天尝试各种我能想到的找到的办法都没办法调出grub,包括重装ubuntu的grub、重新配置EFI分区的引导文件、删除win10的引导项然后重新装grub、copy另一台一样的机子的EFI分区文件等等等。鉴于时间关系,我没有继续深究EFI的工作原理,以及win的引导与grub的原理,后来我直接再次重装了。

我推荐分区还是用MBR好些,如果你的硬盘不超过2T的话,因为easyBCD真的很好用。装win的话还是用GHO镜像吧,又快又保险。如果不想折腾,先装win再装linux,否则grub死活调不出来。

0%